There's more and more info becoming available about the Explore and Design Space. And I keep forgetting where I've read something... So I'm going to start putting some links here so I'll know where to look! I'll add more as I find them.
Official Cricut Explore FAQ
Official Cricut Blog
Official Cricut Facebook page

Thursday, January 30, 2014
Monday, January 27, 2014
The new Cricut Explore
Just when things couldn't get any more exciting last week than my blog getting a makeover.... Provocraft come along and announce their new Cricut - the Cricut Explore!!!

Here's some info about the Explore from the cricut.com website.
Here's some info about the Explore from the cricut.com website.
MACHINE FEATURES & DETAILS
- Smart Set™ dial for material selection
- Dual carriage heads
- Integrated storage compartments
- Cricut Design Space™ software
- 50+ free project ideas
- 100+ free images
- Compatible with PC/Mac
- Included in the box:
- Cricut Explore™ machine
- German carbide blade
- Metallic silver pen
- USB cord and power cord
- 12" x 12" StandardGrip Cricut® cutting mat
- Getting started guide
- Black and jade Cricut® cardstock
- Silver Cricut® vinyl
- White Cricut® iron-on
- 2 Duck Tape® sheets
The Explore will retail at US$299. It will have its launch on HSN on February 12. Check out the HSN website for more details and don't forget to sign up for reminder emails of when to watch.
The Explore will then be available in retail stores on March 15.
If you've been around the Cricut world for a while you've most likely heard of Joy from Obsessesd with Scrapbooking and Melanie from Courtney Lane Designs. Joy and Melanie were lucky enough to attend the launch of the Cricut Explore last week. Here's a link to Melanie's post that covers pretty much everything you need to know about this amazing new machine.
There's a lot of information about the Explore out there. Some of it correct, and some of it just guess work and incorrect assumptions. So don't believe everything you read!
Check out the Cricut Website for info and videos.
If you need more details on the Explore you can ask PC at the Official Cricut Facebook page.
I'm pretty excited about this new machine and can't wait to get one! The only thing I'm slightly disappointed at is that the Design Space program has to be used online. I've spent many a day sitting at my computer using CCR yelling at it to "hurry up!!!!!!!" Hopefully Design Space will work better in that regard than CCR.
I'm also hoping that some of the functions that I've been wanting to see in CCR will finally be in Design Space..... those being automatic multiple offset (shadows) of any font and image and the ability to cut images that are partly outside the cutting boundary of the mat. Just those two things will make me a very happy girl!
Only time will tell but this will really show whether they have listened to their customer base!
Oh, and if they could make it so their customers outside the US, Canada and UK are able to purchase digital artwork from their store, they'd make a lot of Australians and New Zealanders very happy!
So, how about it Provocraft???
Sunday, January 5, 2014
CRICUT: CCR - Copying objects to a new mat layer
Do you want to copy or move images from one mat layer and place them on a different mat layer? Well here's how you do it.
A new layer (Layer2) will be added to your project.
The image will be copied to the clipboard.
The image will be pasted to Layer 2.
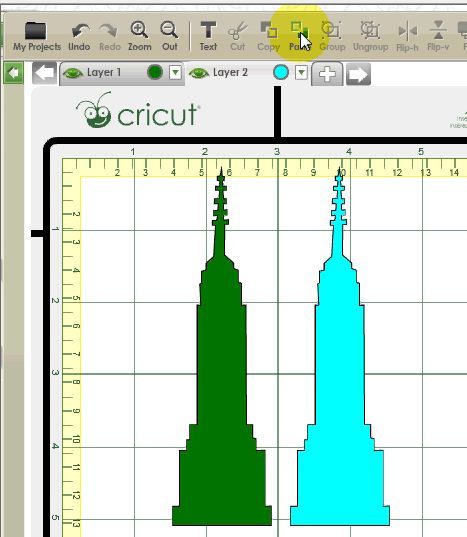
You can see that it worked because the pasted object is a different colour to the original and matches the coloured dot beside the layer name.
If you want to move your image from one layer to another instead of copying it, you can follow the instructions above and simply press the Cut button at instead of the Copy button.
Or....
You can follow the instructions above (Copy and Paste) then just go back and delete the image from the first layer after you have pasted it to the second layer.
Copying multiple images
You can use the same process to copy multiple objects. Just select them all before you click the Copy button. (There's no need to group them.) This even works for images that are on different mats!
Having problems getting it to work? Keep the following in mind....
Got any questions? Just ask!!

Download a PDF of this tutorial from here:
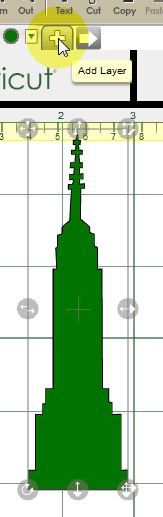
- Place your image on the mat
- Click the + button next to the Layer 1 tab.
A new layer (Layer2) will be added to your project.
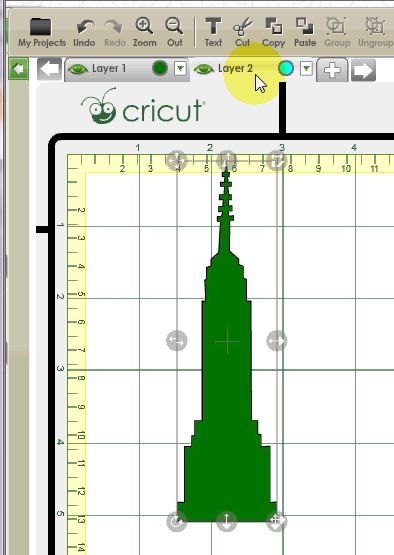
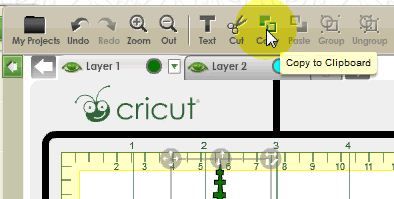
- Click on your first image to make sure it's selected then press the Copy button on the toolbar
The image will be copied to the clipboard.
- Click on the tab for Layer2 to make it active. (It will turn light grey.)
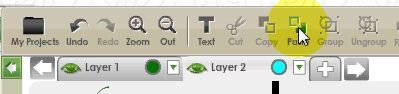
- From the toolbar click the Paste button
The image will be pasted to Layer 2.
You can see that it worked because the pasted object is a different colour to the original and matches the coloured dot beside the layer name.
Or....
You can follow the instructions above (Copy and Paste) then just go back and delete the image from the first layer after you have pasted it to the second layer.
Copying multiple images
You can use the same process to copy multiple objects. Just select them all before you click the Copy button. (There's no need to group them.) This even works for images that are on different mats!
Having problems getting it to work? Keep the following in mind....
- Before you select the Paste button ensure that the correct layer tab is active (light grey)
- Make sure the layer you are pasting to is visible. The eye next to your layer name should be green. (Like the picture above). If the eye is grey your layer is hidden and you won't see your pasted object. Click the eye to make the layer visible. Once you make the layer visible the pasted image should appear.
Got any questions? Just ask!!
CRICUT: Linking your cartridges
Here's some instructions on linking your carts to your Cricut account.

Keep in mind the following:


This tutorial originally published 25/1/2013 on my previous blog: http://www.cricutcraftroomblog.blogspot.com.au/.
That blog is no longer being updated so please follow me here for any new Cricut Craft Room tutorials.
Keep in mind the following:
- Once you have linked a cart to your account you can't unlink it.
- You can only link your carts to one CCR account.
- You don't have to link your carts to cut from CCR.
- Carts that you have already linked to your Gypsy can also be linked to your CCR account. Log in to your CCR account then select Gypsy Link from the Options menu. Follow the instructions from there.
- Your carts don't have to be registered to enable you to link them.
- Your carts don't have to be bookmarked for you to link them.
- If you purchase a Digital cartridge from Cricut.com it will automatically be linked to your account.
- If you're using the Imagine, the E2 or the Mini first make sure it is up to date by connecting it to your compute; powering it on and opening Cricut Sync.
- If you see this message when you are linking a cart, it means it has already been linked to a Gypsy and can't be linked to CCR yet, or it has been linked to another CCR account.

Linking instructions:
- Insert the cartridge you wish to link into your Cricut.
- Highlight the cart you wish to link from the All Cartridges library then click on the Link button

- Click on the Cricut you are using, then click the Select Device button (or double click the device name)

- Once your cartridge is detected, click the Link Cartridge button.

- You will need to accept the End User License Agreement to proceed. If you don't wish to proceed press the Cancel button.

- The linking process will begin
- Once the linking is complete you will see this. Press the Okay button

Your cart is now linked to your Cricut account and you won't have to insert it into your Cricut again to cut when using your CCR account!
You will still need them if you're cutting directly from your Cricut, so don't give them away or sell them! (That's what you were agreeing to in step 5 above....)
Once you have linked your carts using CCR they will automatically be also linked to your Gypsy the next time you sync it using Cricut Sync. (This only applies once the cartridges have been added to the Gypsy cartridge library after each Hello Thursday content update.)
Some Digital carts (eg. the single Imagine images) won't be able to be linked to a Gypsy.
CRICUT - CCR Cartridge libraries
Originally published 25 Jan 2013 on my previous blog: http://cricutcraftroomblog.blogspot.com.au/
There are many different menu options in the CCR Cartridge filter.

So what are they all? Some are fairly self explanatory (eg Cricut Lite) but here's what you'll find in each of those categories.
My Cartridges: The My cartridges library will contain any cartridges that you have physically linked to your Cricut account using CCR, any digital cartridges you have purchased from Cricut.com and the "Cut it for free" cartridges that Cricut.com release weekly. Those free cartridges change each week. When the new free cartridges is added, the old one is generally removed.
Now that the Gypsy Link process has been released the cartridges that are linked to your Gypsy will also appear in the My Cartridges library. You will first need to run the Link Gypsy program from the Options menu in CCR.
All Cartridges: Every available cartridge including the Digital cartridges are found in this library. If you don't see any of the Imagine cartridges check the "Show Cricut Imagine cartridges" below the Cartridge filter list.
Cricut Craft Room Exclusives: This will contain all the CCR exclusive Digital cartridges. Digital versions of the regular cartridges won't be found here. They will be found in All Cartridges. Most of the cartridges in this library can also be linked to your Gypsy. However there are some exceptions eg. the single images. Update your Gypsy and check the All Cartridges library. If a cartridge doesn't appear in the All Cartridges library then it can't be linked to the Gypsy.
Cricut Cake: This library contains the Martha Stewart Cake cartridges and the Cricut Cake cartridges.
Cricut Events: This library contains any cartridge that has been branded an Event cartridge. Eg. Baby Shower and Bridal Shower. Look for the Events label on the cartridge.
Cricut Everyday: This library contains the majority of the Cricut cartriges. Anything that doesn't fit into any of the other categories will be found here.
Cricut Famous Friends: Here you'll find cartridges from Close To My Heart, Creative Memories, DC Comics, Disney, Disney/Pixar, Nickelodeon, Sanrio and Sesame Street.
Cricut Imagine: Yes.... you'll find all the Imagine cartridges here!
Cricut Lite: Here you'll find all the exclusive to Walmart and Cricut.com Lite cartridges.
Cricut Projects: Any carts branded as Project carts will be found here. Carts such as Giant Flowers and Frame of Mind.
Cricut Seasonals: If you're looking for something for Christmas, Easter, Thanksgiving, Halloween, Spring, Summer etc you'll probably find it here.
Font Cartridges: Any cartridge that Cricut have identified as having a font on it will be found here.
Bookmarks: Here you will find any cartridges that you have bookmarked. Bookmarking is different to Linking. Bookmarking is merely a convenient way of identifying which carts you own. If you haven't Linked those carts you will still need to insert them into the Cricut if you wish to cut from them.
To add to or edit your Bookmarks click on the Bookmarks filter then click the Edit Bookmarks button.

To Add a bookmark scroll through the list of cartridges and click the green Add button beside the cartridge name.
To remove a bookmark scroll through the list of cartridges and click the brown Remove button beside the cartridge name.
When you have finished click the Continue button and you'll be returned to the main CCR screen.

Your newly bookmarked cartridges will now appear in the Bookmarks filter.
Wish List: Got a hankering for some new cartridges but aren't ready to purchase them? You can add them to a Wish list so you don't forget.
Select Wish List from the Cartridge filter then click the Edit Wish List button.

To Add a cartridge to the Wish List scroll through the list of cartridges and click the green Add button beside the cartridge name. You will see every cartridge listed here, even ones you already own and have linked to your account. (You never know when you might want to buy a cartridge for someone else, right???)
To remove a cartridge from the Wish List scroll through the list of cartridges and click the brown Remove button beside the cartridge name.

If you would like to print your Wish List click the Print Wish List button and select your printer. When you have finished click the Continue button and you'll be returned to the main CCR screen.
There are many different menu options in the CCR Cartridge filter.

My Cartridges: The My cartridges library will contain any cartridges that you have physically linked to your Cricut account using CCR, any digital cartridges you have purchased from Cricut.com and the "Cut it for free" cartridges that Cricut.com release weekly. Those free cartridges change each week. When the new free cartridges is added, the old one is generally removed.
Now that the Gypsy Link process has been released the cartridges that are linked to your Gypsy will also appear in the My Cartridges library. You will first need to run the Link Gypsy program from the Options menu in CCR.
All Cartridges: Every available cartridge including the Digital cartridges are found in this library. If you don't see any of the Imagine cartridges check the "Show Cricut Imagine cartridges" below the Cartridge filter list.
Cricut Craft Room Exclusives: This will contain all the CCR exclusive Digital cartridges. Digital versions of the regular cartridges won't be found here. They will be found in All Cartridges. Most of the cartridges in this library can also be linked to your Gypsy. However there are some exceptions eg. the single images. Update your Gypsy and check the All Cartridges library. If a cartridge doesn't appear in the All Cartridges library then it can't be linked to the Gypsy.
Cricut Cake: This library contains the Martha Stewart Cake cartridges and the Cricut Cake cartridges.
Cricut Events: This library contains any cartridge that has been branded an Event cartridge. Eg. Baby Shower and Bridal Shower. Look for the Events label on the cartridge.
Cricut Everyday: This library contains the majority of the Cricut cartriges. Anything that doesn't fit into any of the other categories will be found here.
Cricut Famous Friends: Here you'll find cartridges from Close To My Heart, Creative Memories, DC Comics, Disney, Disney/Pixar, Nickelodeon, Sanrio and Sesame Street.
Cricut Imagine: Yes.... you'll find all the Imagine cartridges here!
Cricut Lite: Here you'll find all the exclusive to Walmart and Cricut.com Lite cartridges.
Cricut Projects: Any carts branded as Project carts will be found here. Carts such as Giant Flowers and Frame of Mind.
Cricut Seasonals: If you're looking for something for Christmas, Easter, Thanksgiving, Halloween, Spring, Summer etc you'll probably find it here.
Font Cartridges: Any cartridge that Cricut have identified as having a font on it will be found here.
Bookmarks: Here you will find any cartridges that you have bookmarked. Bookmarking is different to Linking. Bookmarking is merely a convenient way of identifying which carts you own. If you haven't Linked those carts you will still need to insert them into the Cricut if you wish to cut from them.
To add to or edit your Bookmarks click on the Bookmarks filter then click the Edit Bookmarks button.
To Add a bookmark scroll through the list of cartridges and click the green Add button beside the cartridge name.
To remove a bookmark scroll through the list of cartridges and click the brown Remove button beside the cartridge name.
When you have finished click the Continue button and you'll be returned to the main CCR screen.

Your newly bookmarked cartridges will now appear in the Bookmarks filter.
Wish List: Got a hankering for some new cartridges but aren't ready to purchase them? You can add them to a Wish list so you don't forget.
Select Wish List from the Cartridge filter then click the Edit Wish List button.
To Add a cartridge to the Wish List scroll through the list of cartridges and click the green Add button beside the cartridge name. You will see every cartridge listed here, even ones you already own and have linked to your account. (You never know when you might want to buy a cartridge for someone else, right???)
To remove a cartridge from the Wish List scroll through the list of cartridges and click the brown Remove button beside the cartridge name.

If you would like to print your Wish List click the Print Wish List button and select your printer. When you have finished click the Continue button and you'll be returned to the main CCR screen.
CRICUT - Quick CCR cutting tip
Originally published on my "Cricut CraftRoom Blog" 2nd Feb 2013
Here's something that I regularly do when I have a mat full of objects and I only want to cut some of them... Let's say my mat looks like this:

There's shapes and text from several carts on the mat. But say I only want to cut "celebrate" and one of the hearts.... ...
I could create another mat layer in my project and cut and paste the other images to the new mat. ...
Or I could select the ones I don't want to cut and delete them.
Or..... what I do is move the images I don't want to cut away from the cutting area of the mat.
You may know by now that any images that go outside the yellow border around the mat won't cut. While that's annoying when I want to cut a large image in sections I can at least use that to my advantage.
Click the Zoom Out button on the toolbar so that you can see the white area to the right of the mat.


Now drag the images that you don't want to cut over to the white area beside the mat.
Move your other images to where you want them to cut. (You don't even have to move them right off the mat. If even part of the image goes over the yellow line it won't cut.)

Click Cut/Go to send your project to the Cricut. After it has cut the two shapes that are on the mat you will see this message:

Press the OK button to return to the cutting screen then press Done. Easy right????
If you want to cut some of the other shapes, just move them back onto the mat and move the others off if necessary. Then cut your project again.
There's no problem saving your project with the images off the mat. Just remember next time you open it your mat will probably be zoomed in and you may not see those images until you zoom out again.
Here's something that I regularly do when I have a mat full of objects and I only want to cut some of them... Let's say my mat looks like this:

There's shapes and text from several carts on the mat. But say I only want to cut "celebrate" and one of the hearts.... ...
I could create another mat layer in my project and cut and paste the other images to the new mat. ...
Or I could select the ones I don't want to cut and delete them.
Or..... what I do is move the images I don't want to cut away from the cutting area of the mat.
You may know by now that any images that go outside the yellow border around the mat won't cut. While that's annoying when I want to cut a large image in sections I can at least use that to my advantage.
Click the Zoom Out button on the toolbar so that you can see the white area to the right of the mat.


Now drag the images that you don't want to cut over to the white area beside the mat.
Move your other images to where you want them to cut. (You don't even have to move them right off the mat. If even part of the image goes over the yellow line it won't cut.)

Click Cut/Go to send your project to the Cricut. After it has cut the two shapes that are on the mat you will see this message:
Press the OK button to return to the cutting screen then press Done. Easy right????
If you want to cut some of the other shapes, just move them back onto the mat and move the others off if necessary. Then cut your project again.
There's no problem saving your project with the images off the mat. Just remember next time you open it your mat will probably be zoomed in and you may not see those images until you zoom out again.
Subscribe to:
Posts (Atom)